 |
| Where we left off... |
I want to apologize for dashing off last time and leaving you with an unfinished project. Things can get very hectic at Annake's Garden this time of year. We were doing a quickpoint project which was destined to be a new addition to my series of whimsical needlepoint pictures that I call ‘Close Encounters’. This quickpoint picture features a bear in a field of sunflowers and a background of snowy mountains and Colorado blue sky. When I left you, the picture was complete except for the bear's features and one more finishing touch...
 |
| Detail of bear's face |
Then it was time to remove the picture from the frame and gently steam-press its surface. J.D. then polished the frame and got it ready to receive the finished picture.
 |
| Just one step left... |
 |
| Waste canvas |
I call these pictures ‘Close Encounters’ because each shows a mammal encountering a very different kind of animal (in this case, a bee.) In order to add the bee to the picture I had to make smaller stitches than the quickpoint canvas would allow. I used a special canvas, called waste canvas. Its threads can easily be removed after the needlepoint (or cross-stitch) is complete. It can be used on fabric as well as canvas or completed stitches. Let me show you how it is done, starting with a picture of the waste canvas, which can be worked as either mono canvas or penelope canvas. Since I planned to do the bee in tent stitch, I chose the mono option.
I had to work out the bee design on graph paper. There are hundreds of species of wild bees in our western mountains. Some of them have bodies as large as as the last joint on my thumb! This design does not represent any particular wild species. Since I expected the thickness of the stitches on the bear's nose to present some problems, I first tried the pattern on waste canvas over a piece of heavy felt.
 |
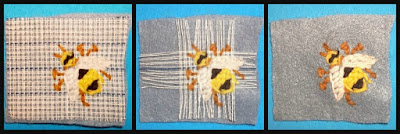
| Steps in creating the bee on felt using waste canvas |
First a piece of waste canvas larger all around than the design to be stitched was cut out. If the design is very large, it is then pinned or basted to the background. (I prefer basting because it is more secure.) This one was so small that it didn't need to be basted. Then the stitches were put in just as they would be on regular mono needlepoint canvas. (I don't pull the stitches quite as tight as I would do ordinarily.) The next picture shows the finished design with some of both the horizontal and vertical threads pulled out. (A pair of small tweezers is useful for this.) The last picture shows the design on the felt with all waste canvas removed
The remaining steps were to repeat the design on the bear's nose and to turn the piece over to J.D. for framing. Now this ‘Close Encounter’ (title as yet undetermined – suggestions?) is complete. The meetings, so far, have been friendly. I hope this one will be, too.
 |
| Finished quickpoint picture of bear and bee |
Now I want to mention a use of quickpoint that I neglected to discuss in the previous post about quickpoint (March 31, 2017): quickpoint bargello.
Unlike tent stitch and the other traditional needlepoint stitches, bargello stitches are not short, slanted stitches. They are long, straight stitches. The lengths may differ, but a common stitch covers four strands of canvas thread. Two stitches share a square of canvas where one stitch begins and the other one ends. If you are working on #5 canvas, as I did in today's project, each of those straight stitches covers a lot of canvas, so you want to use a yarn that is going to cover that space under each stitch. You can see these long stitches put together in the “Aspen Trees” canvas here.
 |
| Quickpoint bargello pillow "Ocean Waves" |
This type of bargello works up really quickly and is not hard for older eyes and hands. Here are some other examples of quickpoint bargello from the post for May 1, 2013. If you have never tried bargello, quickpoint is a good way to get started. The first one is called “Ocean Waves” for obvious reasons.
 |
| Bargello pillow and picture using the same stitch |
The second pillow is called “Evergreens” and features a strong all-over bargello pattern. The picture on the wall is entitled “Firs and Feathers”. It is done in a technique that I call ‘Bargello Plus’. This combines a large area of a bargello pattern with an area of conventional tent stitch to give a realistic addition, like the eagle in the picture.
 |
| "Bear-ly There", available in our Etsy shop |
Here is another example of 'Bargello Plus', entitled “Bearly There”. It combines the bargello pattern used in “Aspen Trees” with a realistic figure of a bear.
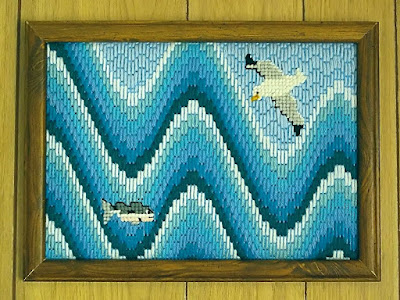
Finally, here is a picture which uses the “Ocean Waves” bargello design with tent stitch inserts of a fish and a seagull. I called it “Seafood Surprise”. You can decide for yourself which creature is going to get the biggest surprise!
 |
| Bargello Plus picture "Seafood Surprise" |
Finally, a question from a reader: Did you ever find a source for standard quickpoint canvas?
JoAnn's online site shows some simple quickpoint kits designed for children. They are inexpensive. You could re-purpose them to do any picture you want to do. Otherwise, I think your best sources are the “gently used” shops, yard sales, and garage sales. If you have a weekly shopping flier, you might put an ad in the “Wanted” section. Contacting needlework and craft shops online is another possibility. If you find a good source, please let me know, and I will pass the information along.
 This post by Annake's Garden is licensed under a Creative Commons Attribution-NonCommercial-ShareAlike 3.0 Unported License.

No comments :
Post a Comment
Post a New Comment Below -- We Love Feedback !!!