 |
| J.J.'s rose photo |
There are at least three reasons for painting needlework canvases. The first is to obliterate a design that is already painted on the canvas so that the canvas can be “re-purposed”. Many people buy kits, fully intending to complete the project. But they lose interest for whatever reason and it never gets made. Then the “orphaned” kits are consigned to thrift shops or yard sales. I picked up a pillow-sized kit for a dollar. The kit was complete, but I had no use for the cartoon design. Therefore, I needed to cover up the design. I put down a heavy pad of newspapers to protect my dining room table, and covered it with a layer of paper towels. This layer keeps the newsprint from discoloring the canvas when it gets wet. Then I thin white acrylic craft paint with a little lukewarm water. J. D. occasionally likes to bake some refrigerated cinnamon rolls for breakfasts or late-night snacks. I wash and save the little cups the icing comes in to use as paint cups. Any “leftovers” can be covered with aluminum foil and stacked in the refrigerator. They don't take up much room and stay liquid for an amazingly long time.
If you like, you can use the foam paint brushes for this type of work and throw them away when you are finished. (They fray against the canvas, so I don't recommend re-using them.) I prefer bristle brushes, however. Because the acrylic paint is water-soluble, it washes out completely with a little care and patience. A brush about an inch wide — either round or rectangular — is ideal for this purpose. To cover a design, I like to use a daubing or “pouncing” motion with my brush, so a round brush is slightly more preferable than a rectangular one. If you can find an old-fashioned shaving brush, that's perfect. Clean your brush promptly and thoroughly, spreading the bristles all the way to the ferule and rinsing until the water runs clear. Reshape the brush while it is damp and stand it in a container to dry with the bristles pointing up.
First I press the canvas on the wrong side with a warm iron to take out any creases. Once it will lie flat, I place it in the middle of the newspaper pad. I dip my brush in the paint, then allow any excess paint to drip back into the paint cup. I work on one section of the design at a time, using just enough paint to cover the color. Some colors are more resistant than others. When I can no longer see the design, I rotate the canvas 180 degrees and touch up any spots the brush had missed. Then I stroke the white paint lightly over the entire canvas and let it dry completely. I discard the paper towels and any dampened newspapers.
The second reason for painting the canvas is toning. No matter how carefully you stitch, a few bits of canvas are likely to show through. The larger the mesh of the canvas, the more likely this is to occur. Therefore, I like to paint larger-mesh canvases with a tone that is prevalent in the picture. This makes the bits of revealed canvas less noticeable. For example, I toned the canvas for the “Aspen” bargello needlepoint (May 1, 2013 post) in a medium yellow and the one with the ocean wave bargello design (January 16, 2014 post) in a medium blue-green. You can see the toning on the edges of the canvas. At his point, I had not decided whether to do the pillow top in latch-hook or grospoint. I was considering a pink camellia or water lily as a subject, so I decided to tone the canvas in a medium pink. (I was also considering this blog post, so I decided to start fresh on the back side of the canvas I had just painted.)
 |
| Annake toning canvas horizontally |
For toning, I use long parallel strokes, so a rectangular brush suits me better. I cover the canvas with overlapping horizontal strokes, then let it dry for about an hour. It need not be completely dry. Then I repeat the process with overlapping vertical strokes. I pay particular attention to the outer edges where the pillow top will be joined with the pillow backing. Canvas is more likely to show through there than at the center of the design. Then I let the canvas dry completely. If I'm painting a much finer canvas like #14 mono canvas, I go back over the canvas with a pin to make sure there are no squares of mesh that were clogged with paint. If there are some, I rotate the pin point in them until they are open again.
J.D.'s sister, J.J., is also an accomplished photographer. Recently she sent me a number of photos she had taken on a trip to Florida. Among them was the dew-drenched rose at the top of this article. I was fascinated by the interplay of colors, especially the pale blue and lavender — so unexpected in this pink-and-yellow rose. So now I had the subject I wanted. My toned canvas was darker than some of the colors in the rose and lighter than others. That was exactly the effect I was striving to create. It would seem normal and unobtrusive wherever it showed in the rose itself, and should disappear in the dark blues and greens of the background.
 |
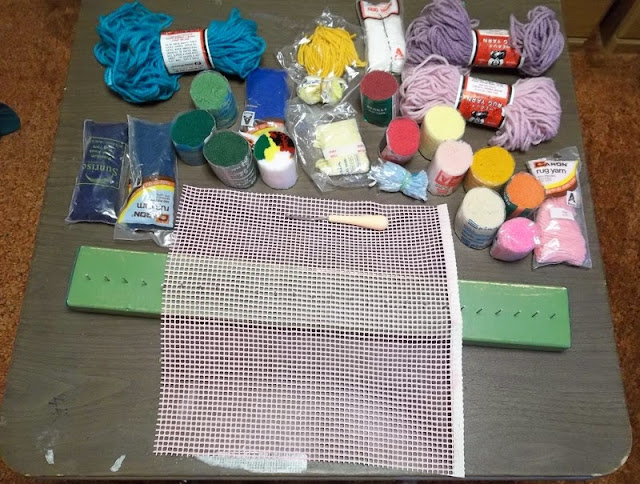
| Tools and materials for rose latchhook project |
You can see the toned canvas up on pins ready to be worked, along with the yarns used to make the picture. Did I really use all of those colors? Yes, I really did — including the ones that needed to be cut. I was able to use some of the cut yarn from the kit (the multicolored pack near the center), but the yarn was far thinner than my other yarns, so I had to use two strands at a time. I made no attempt to show the dewdrops, but I would like to do the design again in petitpoint and sew on tiny, clear glass beads for some of the dewdrops.
 |
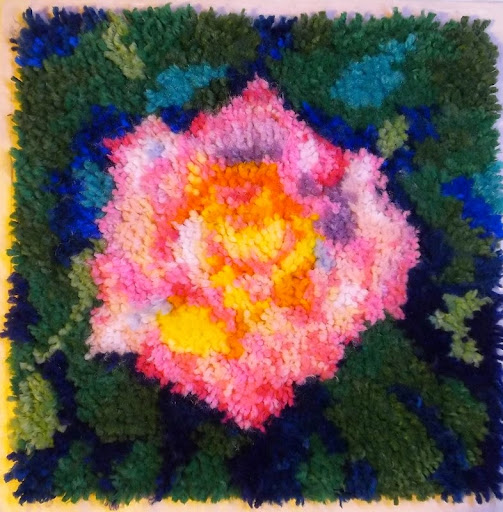
| Completed latch hook picture of J.J.'s rose |
Here are two views of the finished pillow top. I love Impressionist paintings and latch-hook allows me to achieve that pointillist effect. The second picture (below) is of the other side of the canvas, reversed so that its orientation is the same as the front. This gives you an idea of how the project would look in quickpoint or grospoint, except that you would not be able to see as much of the canvas mesh with those techniques. I will make a color chart of the back of the canvas for future reference before I make the top into a pillow.
There's a third reason for painting a canvas, but that's a topic for another day.


